Showing posts with label treats. Show all posts

Monday, December 23, 2013

Homemade Snickers Bars..


I have never been a chocolate lover so every halloween growing up my dad would steal all my snickers bars. They are his absolute favorite. When I found a homemade recipe last week, I decided I had to make them for him for one of his Christmas presents. 

I was a little worried that they would be hard to make. I love baking but I never seem to have good results when I try to make candies..but I assure you, they were simple to make and actually a lot of fun. I think if I make them again I'm going to make them peanut free so that I can test them out (I hate peanuts!)


Homemade Snickers Bars
[recipe from Nikki, who lightly adapted it from and old Taste of Home recipe]
makes one 9×13 pan
bottom chocolate layer
1 1/4 cups milk chocolate chips
1/4 cup peanut butter
Thoroughly grease you baking pan. Melt ingredients together in a saucepan or microwave, then pour into the baking dish and spread until even. Let cool and harden completely.
nougat layer
1/4 cup unsalted butter
1 cup granulated sugar
1/4 cup evaporated milk
1 1/2 cups marshmallow fluff
1/4 cup peanut butter
1 1/2 cup salted peanuts chopped, roughly chopped
1 tsp vanilla extract
Melt butter in a saucepan over medium heat. Add in sugar and milk, stirring until dissolved and bring to a boil. Let cook for 5 minutes, stirring occasionally. Add in fluff, peanut butter and vanilla, stirring until smooth. Turn off heat and fold in peanuts, then pour over bottom chocolate layer. Let cool completely.
caramel layer
1 14-ounce bag of caramels
1/4 cup whipping cream
Combine ingredients in a saucepan over low heat. Let melt, stirring occasionally, until smooth – this took about 10 minutes for me. Pour over nougat layer and let cool completely.
Top chocolate layer
1 1/4 cups milk chocolate chips
1/4 cup peanut butter
Melt ingredients together in a saucepan or microwave, then pour over caramel and spread until even. Let cool and harden completely.
Refrigerate for at least one hour before serving, then cut as desired. 


The mister told me they are awesome and taste just like a snickers bar. If you have a snickers lover in your family these should be on your "make me" list this holiday!

Thursday, September 05, 2013

Concord Grape Pie

Last week the mister bartered some soap for some potatoes and concord grapes at the market. Which lead me to baking up a concord grape pie on Sunday.

I have never had a grape pie before, I never even really heard of making one until the mister mentioned it. I think it may be a New England thing (and also Northern California thing).. But now that I have made it. Holy mother was it amazing! It tasted like grape juice in a pie.


CONCORD GRAPE PIE:

Ingredients:

1 1/2 lb(4 cups) concord grapes
1 csugar
1/3 cflour
1/4 tspsalt
1 Tbsplemon juice
2 Tbspbutter, melted
19-inch unbaked pastry shell
Crumbles:
1/2 cflour
1/2 csugar
1/4 cbutter


Directions:

Slip skins from the grapes. (This is actually really easy - they just "pop" right out). Place skins in one bowl and the pulp in another. 


Bring the pulp to a boil, reduce the heat and simmer for 5 minutes (uncovered). Sieve to remove seeds. Add the skins, sugar, flour and salt and melted butter. (I actually added more flour, almost another 1/3 cup because it was SO watery and I was really worried that it wouldn't thicken). 

Pour into a unbaked 9" pie shell (I actually had one left over from my mini peach pies I was making, so it saved me from making more crust). Bake at 400 degrees for 25 minutes.

While that is baking, make the crumbles. 

Sift the flour and sugar together, cutting in the butter until it is crumbly.

Sprinkle on top of the pie and bake for another 15 minutes.

So amazingly yummy!! You have to make this up if you are able to get your hands on some concord grapes.


Tuesday, August 06, 2013

Individual Peach Pie...


So the idea for these babies came from here but when I was at the market, no one had any honey comb so I bought some local honey. I also am a little bit of a "crust snob" and never go the easy route with premade crust, only homemade for us. And I could not resist adding some icing to make them feel more like the hostess pies I had when I was growing up. (Man, I know those things are loaded with bad stuff - but they are just so darn delicious!)

So if you want to make my version, here it is:

Preheat oven to 425 degrees F

Ingredients
Fresh peaches (we got white peaches from the farmer's market)
Honey 
Pie Crust 
Milk
Powdered Sugar


Pie crust (via Martha Stewart November 2012 issue):
2 sticks unsalted butter, chilled, cut into pieces and divided
2 1/2 cups flour
1 tsp salt
1 tsp sugar
1/2 cup ice water

1. Lay out three quarters of the cubed butter pieces on parchment and freeze until hard, at least 30 minutes. Take the remaining butter and refrigerate.

2. Combine flour, salt, and sugar in a food processor. Add refrigerated butter and pulse to combine, roughly 10 times. Add frozen butter, and pulse until mixture resembles coarse meal with some blueberry sized clumps.

3. Add ice water, immediately pulse until water is just incorporated, about 10 times. Squeeze a small amount of dough to make sure it holds together.

4. Lay out 2 pieces of plastic wrap. Empty 1/2 the dough onto each piece. Bring the edges of wrap together to gather the dough. Press into disks.

5. Roll out the disks, still wrapped in plastic, to 1/2" thick rounds (8"). Refrigerate at least 45 minutes and up to 2 days. (dough can be frozen for up to one month)


I only used one of the rounds, the other is in my freezer for next time. Or you can use both if you have a large family, or well don't want them to be gone the first day you make them!

Next Steps:

Cut the peaches in half and dig out the pit. In one side of the peach, fill with honey. Place the sides back together and wrap in dough. I took my round, rolled it out and cut into four pieces - I'm sure if I rolled it even thinner I could have easily gotten 5 pieces to wrap.

I wrapped each peach. Placed them in a muffin tin and then took a little bit of milk and washed the tops with the milk. Cut a few small slits in each top and bake for 15-17 minutes until golden.

ICING:

Take 1 cup powdered sugar and 3 tablespoons of milk and stir.

Once your pies are out of the oven and cooled, drench (or drizzle) in icing.


Tuesday, July 16, 2013

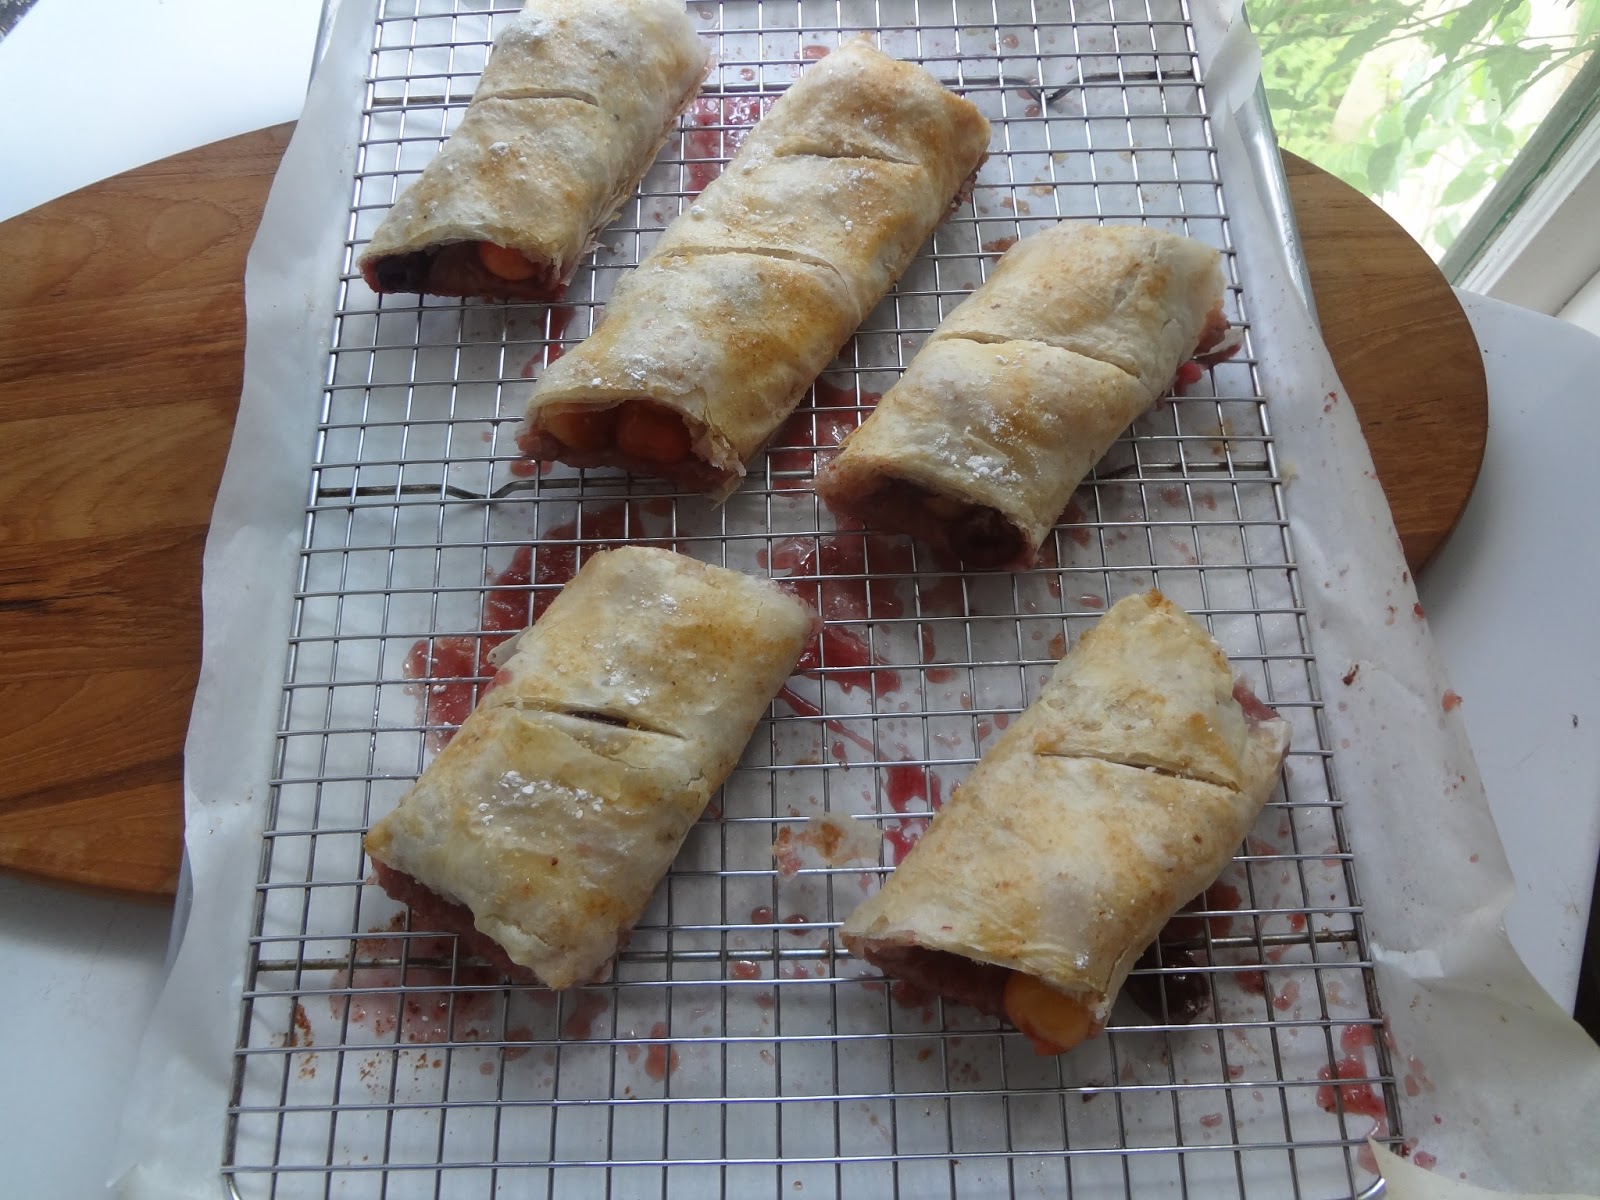
Hungarian Cherry Strudel


Cherries have always been one of my favorite fruits. When I was little I used to hang out with my grampa and every day we used to each eat a small jar of cherries! haha This weekend when I saw many of the vendors at the markets with their fresh cherries I knew I needed to get a bunch! I got two different types, but both are sweet cherries (the following recipe calls for sour)

Last week I had found this recipe and I knew I needed to make it as soon as cherries showed their faces at the market. I've never worked with phyllo dough before, so that was a new experience. Surprisingly it was a lot easier than I thought it was going to be and I actually didn't follow her instructions to a T.

She advised to cover the phyllo dough with wet/damp tea towel. But when I did that the first layer of phyllo was extremely difficult and sticky to work with. So I took the towel off and just worked quickly. Because I knew it was going to make the dough sticky, I also did not assemble them on a tea towel, but rather right on my parchment paper and cookie tin. Maybe I did something completely wrong here - but I seemed to make out just fine doing it my own way.

I also did not have walnuts (and actually don't like nuts) so I left them out of the recipe as well.


Here is her RECIPE (taken directly from playin with my food blog)

(you really all should check out her blog, she has amazing recipes and gorgeous photos to boot)

INGREDIENTS

  • 1 package frozen phyllo dough, defrosted according to pkg. directions
  • 1 stick butter, melted
  • 1 cup walnuts, ground
  • 1/2 cup sugar, or to taste
  • 1 cup plain, dry breadcrumbs
  • 3 cups sour cherries, pitted and stemmed

EQUIPMENT

  • 2 dampened tea towels, excess water squeezed out
  • pastry brush
  • baking sheet
  • sharp knife

DIRECTIONS

Preheat oven to 400F. Butter a baking pan. Toss the cherries with the sugar in a bowl and set aside for 15 minutes. When you are ready to assemble the strudel, line up the walnuts, bread crumbs, melted butter, and cherries in separate bowls. Carefully unwrap the phyllo dough, leaving it to sit on its wrapper, covered in the dampened tea towel to prevent it from drying out. Lay the other tea towel in front of you. Place 1 leaf of the phyllo dough on the towel. Using the pastry brush, sprinkle, do not brush, a little butter over the dough. Go light. You don't want to cover the entire surface. Sprinkle lightly with the bread crumbs and the walnuts. Repeat with 5-6 layers. Add about 1-1/2 cups cherries to the top layer. Make sure you've squeezed out some of their liquid. You don't want them to be too wet. Using the towel as a guide, roll it up into a log. Brush the entire loaf with melted butter.  Using your knife, cut diagonal slices, being careful not to cut all the way through. Bake at 400F for about 15 minutes or until golden. Cool in the pan on a rack. Sprinkle with powdered sugar, slice, and enjoy!

MAKES 2 STRUDELS


Oh man they are so good, we prefer them when they were chilled , but I didn't complain eating a little piece when they first came out of the oven either! It was such a simple recipe and I'm thinking of all the fruits to do these with. Next up, apples. 

Oh and to make you all drool a little bit more today..I also made this Jumbo zucchini bread. It took forever to bake. I used my gramma's recipe that I posted last year. Oh so good! A yummy baking (hot, over 90+ and humid) weekend, what was I thinking having the oven on so much?!


Tuesday, April 02, 2013

tasty tuesdays - cadbury egg brownies


Last friday I had posted about these Cadbury Egg brownies that I wanted to test them out. So I did, and they went over fabulously. I actually switched up the recipe because I was worried they would be too "fudgey" so I swapped out the brownie portion of the recipe with Ghirardelli Classic Brownie recipe. If you want to try the original version, please check out the link


Cadbury Egg Brownies (adapted from love and olive oil)

Ingredients:

For Brownies:
4oz semi-sweet baking bar
1 Cup packed brown sugar
2 large eggs
1/4 tsp baking powder
1/2 tsp salt
1 stick (1/2 cup) unsalted butter, cut into cubes
1 tsp vanilla
3/4 Cup & 2 TBS flour

For cream filling:
1/4 Cup light corn syrup
2 TBS unsalted butter, room temperature
1/2 tsp. vanilla extract
1/8 tsp salt
1 1/2 Cups powder sugar

For glaze:
3oz semi-sweet chocolate
2 TBS unsalted butter, cut into cubes

Directions:
Preheat over to 350 degrees. Butter and flour an 8" x 8" pan. In a heavy 1 1/2 qt saucepan, melt chocolate bar and butter over low heat, stirring until smooth. Remove pan from heat; cool to room temperature. Stir in brown sugar and vanilla. Add eggs, mix well. In bowl, sift together flour, baking powder and salt. Slowly fold in flour mixture; mix well. Pour batter in pan. Bake for 25-30 minutes, or until tester comes out clean.

Allow brownies to cool completely.

For cream filling, beat together corn syrup, butter, vanilla, and salt on medium-high speed until smooth. Add powdered sugar, a little at a time, mixing until creamy. Place 3/4 of the cream mixture on top of the brownies and spread into an even layer.

Add one to two drops of yellow food coloring to the remaining cream mixture and stir until evenly colored. Drop dollops of yellow cream on top of the white layer, and then swirl gently with a spatula. Refrigerate for at least 2 hours or until set.

For glaze topping, gently melt chocolate and butter together. Stir until smooth. Pour over the cream filling, carefully spreading into a thin, even layer. Return to refrigerator and chill until set, at least 30 minutes, or overnight if possible (brownies are best when chilled overnight)

Using a VERY sharp knife, cut into teeny squares. Brownies will keep, refrigerated in an airtight container, for up to 5 days.


They were pretty difficult to cut, I had the mister cut them. We cut them in teeny little pieces, the size of small chocolate bars. So yummy. If you make them let me know how they turn out, also if you make them via the original recipe. I'd like to test out the difference at some point. Make sure you set aside half your evening to make these, there is a lot more work to them than I thought!


Tuesday, March 26, 2013

tasty tuesdays.. classic shortbread


Classic Shortbread (via Martha Stewart's Cookies Cookbook)

Ingredients:
2 Cups Flour
1 1/4 tsp coarse salt (I used fine sea salt)
1 Cup (2 sticks) unsalted butter, room temperature
3/4 Cup confectioner's sugar

Easy peasy:

1. Sift flour and salt in a bowl. Put butter in your stand mixer and mix on medium for 3-5 minutes, until fluffy. Gradually add in the confectioner's sugar, beat until pale and fluffy, about 2 minutes. Add flour mixture and mix until combined.

2. Preheat oven to 300 degrees, with rack on the upper third

3. Using plastic wrap, press dough into a buttered 10 inch tart pan with removable bottom. (I dont own a tart pan- something on my baking wishlist, so I substituted a cheesecake pan. So mine don't have the fancy edges but it still worked) With plastic wrap on the dough, refrigerate for 20 minutes. 

4. The recipe now says to cut out the center using a 2 1/4 inch cookie cutter and discard. Why on earth would you do this?!that seemed absolutely silliness to me. More cookie bits for me to eat. So I left the center in and I also cut into more than 8 pieces, because well 8 pieces would be enormous! Of course mine came out all wonky and uneven sized. But I don't care! So cut as many as you want! Then take a wooden skewer and prick holes 1/4" intervals. Again. I went all willy-nilly and poked where I wanted to! I was not feeling like following the rules.

5. Bake until golden brown and firm, about an hour. Transfer pan to a wire rack. Recut shortbread into wedges; let cool completely in pan. Cookies can be stored in airtight pan for up to two weeks.

**

They came out so awesome. I was really impressed with myself. I've never made shortbread before. Had I known it was so simple I would have been making it for years. Shortbread is one of my favorites. I love the sweet/salty combo of them. They are just perfect. They also remind me of when I was little. My grandmother would come back from her trips to Ireland and always bring my mom back classic shortbread from over there. It was so yummy. 

In other news (you are all probably sick of me talking about her) but Lola had a horrible weekend. She ended up going backward and her breathing completely declined. Of course things like this always happen on the weekends immediately after the vet closes. Her and I didn't get much sleep. I was up and worried she wasn't going to make it through til Monday. There was a lot of time researching and on the computer, a lot of time rubbing her back, and a lot of time just plain being sad.

She made it to Monday, and Kevin took her in to the vet first thing. I guess He was pretty blunt with him (because she was in such rough shape) He said obviously he will do what we want and can continue giving her steroid shots but basically her immune system has completely failed at this point and that it may be best for us to let her go...

He had him give her the shot, to well..give her a another shot at life. But I can't be put through this again. If we are only going one week at a time and she is in any sort of pain, it's not worth it to us to see her suffer. Dr Mike said, "She's basically a 77 year old, little old lady, who was diagnosed with cancer...it's not good"

so... that's that. Time will tell. Until then I just continue to give her hugs and the best treatment we can.

Tuesday, March 19, 2013

tasty treats Tuesdays.. Lola edition


You may be looking at this thinking, "What the heck did she make this weekend?" Well I shall tell you. It's not for my belly, it's for Lola's.

While the first couple weeks of finding out about Lola and her cancer diagnosis we were very depressed and  so sad for the news, now we have changed gears and on a mission to beat this nasty thing. As you know, Lola (our scottie) was diagnosed with Lymphoma now almost 3 weeks ago. 

Last week she went in for her two week checkup and when we took her, we actually didn't think she would be coming home with us... I was balling the majority of the day and so upset because her health had failed so quickly. Her breathing had decreased and she was having an extremely difficult time with each breath. We didn't want her to suffer and were very close to saying that this may be it.

But our vet thought differently. He said he was very impressed with how much her lymph nodes had shrunk. Every lymph node had been extremely swollen just two weeks prior, now they have shrunk and some have actually even gone down completely. Up to that point in time we had only put her on steroid pills once a day for 7 days, then it had gone to once every other day for the 2nd week. 

It was at this visit that our vet explained that there was another patient that had been been in just as bad, if not worse shape, and was placed on a holistic treatment and is still alive, thriving, and in remission. He said he would put us in touch with the owner and said, for us to try anything and everything.

I went home that night and began researching. Between my own research and speaking with the other pet owner I came up with the following diet. So here it is..

Essiac Tea-Early morning
Veggie/Fruit/ Supplements mix (see above photo)- Breakfast
Yogurt, Flaxseed and Red Clover - Mid morning snack
Veggie/fruit/ Supplements mix with meat - Dinner
Yogurt, flaxseed and red clover - Snack
Essiac Tea- before bedtime

Over the next few weeks I will write up more posts to explain all the foods, supplements and foods we are currently testing out. I have mixed a few different diets and come up with our own daily diet. I'll explain some of the diets out there and let you pick and choose and form your own diet.

Being told that your dog (or cat) has been diagnosed with any form of cancer is completely devastating. Being that we eat an organic, natural diet (not 100% of the time..but mostly!) why would we not do this for the girls.
I have lots of posts that will be coming up explaining dog foods that are currently on the market and the alternatives to feed your pets. Then I will move into the "cancer diet" for your furry friend. You can follow up weekly to follow Lola's progress in the hopes that my combination beats this nasty disease. I have all the confidence in the world that trying this diet and supplements will really help my baby and my other two (who are not sick - but will now be much healthier)

I wish I would have had one place to have everything all in one place - so anything I can put up, links etc will hopefully help out others going through the same battle.

Tuesday, March 05, 2013

tasty tuesday vol 8 - Lemon Blueberry Bundt Cake


Lemon Blueberry Buttermilk Bundt Cake
(adapted from The Sweet Life)

Ingredients:
Cake:
-2 sticks unsalted butter, at room temperature
-1 3/4 cups sugar
-2 2/3 cup all-purpose flour
-1/2 tsp baking soda
-1/4 tsp salt
-1 1/4 cups buttermilk
-1 tbsp lemon zest
-4 tbsp lemon juice
-4 large eggs, at room temperature

**2 Cups blueberries

Icing:
-3/4 cup confectioners' sugar
-1 tbs lemon juice
-1 tbsp water

Directions:
1. Preheat oven to 350F. Generously grease and flour a bundt cake and set aside.
2. Beat butter with sugar for 5 minutes, until smooth and lightly-colored. In a separate bowl, sift the flour, baking soda, and salt. Set aside. In a small third bowl, mix buttermilk with 4 tbsp of lemon juice and the lemon zest.
3. One at a time, add the eggs to the butter sugar mixture, beating after each addition. Alternate adding the dry ingredients with the wet ingredients, beating just until combined

**I added 2 cups blueberries at this point**

4. Pour the batter into the prepared pan.

 Bake for 65-75 minutes, until an inserted toothpick comes out clean. Remove the cake from the oven and place pan on a wire rack until cool to the touch. Run a knife around the edges and flip cake over onto wire rack to cool completely.

5. Whisk together remaining 1 tbsp of lemon juice with 1 tbsp of water and 3/4 cup confectioners' sugar. Add an additional tbsp of water or a bit more confectioners' sugar to get mixture to desired texture. Pour glaze over cake. Slice cake and serve at room temperature.

----------------------------------------------------------------------------------------------------------

I've been talking and thinking about making a bundt cake for a few weeks now. I had some remaining buttermilk left my fridge so I did a hunt for "buttermilk" and found a couple different recipes for bundt cakes.


There is just something so good about the combination of lemons and blueberries so I had to add some. For those of you wondering, I only have enough left for one more blueberry pie until blueberry season again this year! I'll be sad when I use the last of them. But can't wait to go picking again this summer. Nothing better than being able to bake with fresh blueberries!

Make sure to completely cover the inside of your bundt pan! I use vegetable shortening and then coat it with flour. Nothing worse then taking all the time to make something yummy, only to have it stick inside the pan!


The batter was so delicious. Everyone got in on licking the beater. (Unfortunately all the ones that had Lola in them came out super crazy blurry)


Happy Baking!!

Tuesday, February 19, 2013

tasty tuesday vol 7 - Lemon and Strawberry Jam Crumb Bars


These just looked way to good to not make them for my belly this week. So Sunday morning, when my normal baking inspiration kicked in, I got to work. It was a very simple recipe. I did have to add extra jam though. 1/2 cup just didn't cover the entire dish, so it ended up being more like 3/4 cup that I used. 


Meyer Lemon & Strawberry Jam Crumb Bars (via Tutti Dolci)
1 2/3 cups flour
1/4 tsp salt
1/4 tsp baking powder
5 Tbsp unsalted butter, at room temperature
3 Tbsp brown sugar
1/4 cup sugar
Zest of 1 Meyer lemon
1 large egg yolk
1/2 tsp vanilla extract
1/2 cup strawberry jam

Glaze
6 Tbsp powdered sugar, sifted
1-2 Tbsp Meyer lemon juice
1/4 tsp Meyer lemon zest

Preheat oven to 350°F and line an 8-inch square baking dish with parchment paper. Whisk together flour, salt, and baking powder in a medium bowl.
Beat butter and sugars in a large mixer bowl at medium speed until light and fluffy; add Meyer lemon zest. Beat in egg yolk and vanilla. Reduce speed to low and gradually add flour mixture until just combined; dough will resemble coarse meal. Reserve 1 cup dough for topping; use a sheet of parchment to press remaining dough evenly into bottom of prepared baking dish.
Place jam in a small bowl and microwave briefly (about 10 seconds); whisk to loosen. Use a small spatula or the back of a spoon to gently spread jam over dough. Toss remaining dough with 2 teaspoons water to form large crumbs; sprinkle over jam filling. Bake until top is golden, about 23 minutes. Cool completely in baking dish on a rack, then cut into bars with a sharp knife.
To prepare glaze, whisk together powdered sugar, Meyer lemon zest, and juice in a small bowl. Drizzle glaze over bars and let set before serving. Store leftovers in an airtight container in the refrigerator up to 3 days.
Yield – 12 bars (serving size: 1 bar)
------------------------------------------------------------------------------------------------------------------------------------------------------------
The glaze came out tasting like super sweet lemonade. It was so awesome! I don't usually make cookies or bars (other than chocolate chip- or special cookies at Christmas time) but I may start after tasting these! So yummy and really easy to make.


Tuesday, February 12, 2013

tasty tuesday vol 6 - brownies

While I completely and totally love baking from scratch each weekend. Sometimes..well sometimes it's nice to grab a box of brownies and have instant goodness.


This is my favorite brownie mix and comes out perfect and yummy each time. 


Tuesday, February 05, 2013

tasty tuesday vol 5 citrus cookies

There are some days you have failures in the kitchen. Then there are some days you have EPIC failures. This recipe for me, was an EPIC failure.


It started off beautiful. The smells and the mixing of the sugar with the orange zest.. I was pretty excited. But my excitement didn't last long. 


The recipe advised to rolls into small balls, instead I used my small scooper. I had tasted the dough at this point and to be honest wasn't thrilled. It was extremely bland. I assumed once they were baked they would come together. Especially with the glaze..glaze always makes everything better.

So they baked. She advised in her recipe to make sure they don't over-cook. But I couldn't even get them to fully bake! The first batch was in the oven 15 minutes and was still not right. The bottoms were lightly brown but they never expanded and flattened. They were still completely raw in the center.

So the second tray I took my fingers and flattened down each cookie. Hoping by doing this they would bake completely through. It actually made them worse! They didn't bake at all!! After 15 minutes it was still totally and completely raw dough on the tray!!

(this is AFTER they baked for 15 minutes!!)


While the cookies were baking (or so I thought) I made the glaze. And even that was a failure. It didn't set and nothing I was doing could get it to be the correct consistency to set up right. Everything went into the trash.

A wasted afternoon with nothing to show for it except dirty dishes and a garbage bag full of half baked, gross cookies. What a waste.

If you want to give the cookies a try I posted the original link here. Maybe you will have better luck. If you do please let me know!